医療用画像の標準規格、DICOMをPythonで扱う方法を備忘録としてまとめます。
背景
男の子なら誰でも一度は、MRIやCTなどの医療用画像を解析したいと思ったことがあるのではないでしょうか??
ちなみに自分は思ったことありません。
何故こんな記事を書いているかというと、Kaggleの「OSIC Pulmonary Fibrosis Progression」というCTの画像を扱うコンペに参加したところ、DICOM(ダイコム)とかいう初めて見る形式の画像を扱うことになったためです。(コンペ詳細)
自分のようにDICOM形式初めての人の力になれればと思います。
DICOMの扱い方
DICOM(ダイコム)とは?
以下、Wikipediaからの引用です。
DICOMとは、CTやMRI、CRなどで撮影した医用画像のフォーマットと、それらを扱う医用画像機器間の通信プロトコルを定義した標準規格である。 名称はDigital Imaging and COmmunications in Medicineの略である。
https://ja.wikipedia.org/wiki/DICOM
CT、MRI、CRなどの画像診断では、DICOMという規格で統一されているみたいです。
拡張子は[.dcm」になります。
pydicomインストール
Python上でDICOM形式のデータを扱う場合は、「pydicom」を利用するのが一般的です。公式ドキュメントこちらです。(pydicom公式)
とりあえずインストールします。
|
1 |
pip install pydicom |
|
1 2 3 4 5 6 |
#出力結果 Collecting pydicom Downloading https://files.pythonhosted.org/packages/d3/56/342e1f8ce5afe63bf65c23d0b2c1cd5a05600caad1c211c39725d3a4cc56/pydicom-2.0.0-py3-none-any.whl (35.4MB) Installing collected packages: pydicom Successfully installed pydicom-2.0.0 Note: you may need to restart the kernel to use updated packages. |
できました。
メタデータの確認
インストールが完了したので、遊んでみます。
なお、データは上記の「OSIC Pulmonary Fibrosis Progression」のデータを利用しています。
まずは、DICOM形式のデータがどのような情報をもっているか確認しましょう。
|
1 2 3 4 5 6 7 8 9 10 |
import pydicom import os import matplotlib.pyplot as plt #DICOM形式はdsと表記することが多い dir = "./image/CT/1.dcm" ds = pydicom.dcmread(dir) #DICOM形式のメタデータを確認 print(ds) |
|
1 2 3 4 5 6 7 8 9 10 11 12 13 14 15 16 17 18 19 20 21 22 23 24 25 26 27 28 29 30 31 32 33 34 35 36 37 38 39 40 41 42 43 44 45 46 47 48 49 50 51 52 53 54 55 56 57 58 59 |
#出力結果 Dataset.file_meta ------------------------------- (0002, 0000) File Meta Information Group Length UL: 200 (0002, 0001) File Meta Information Version OB: b'\x00\x01' (0002, 0002) Media Storage SOP Class UID UI: CT Image Storage (0002, 0003) Media Storage SOP Instance UID UI: 2.25.12297650151329871895440507938349160734 (0002, 0010) Transfer Syntax UID UI: Explicit VR Little Endian (0002, 0012) Implementation Class UID UI: 1.2.276.0.7230010.3.0.3.6.1 (0002, 0013) Implementation Version Name SH: 'OSIRIX_361' (0002, 0016) Source Application Entity Title AE: 'ANONYMOUS' ------------------------------------------------- (0008, 0005) Specific Character Set CS: 'ISO_IR 100' (0008, 0008) Image Type CS: ['ORIGINAL', 'PRIMARY', 'AXIAL'] (0008, 0018) SOP Instance UID UI: 2.25.12297650151329871895440507938349160734 (0008, 0060) Modality CS: 'CT' (0008, 0070) Manufacturer LO: 'GE MEDICAL SYSTEMS' (0008, 1090) Manufacturer's Model Name LO: 'LightSpeed VCT' (0010, 0010) Patient's Name PN: 'ID00007637202177411956430' (0010, 0020) Patient ID LO: 'ID00007637202177411956430' (0010, 0040) Patient's Sex CS: '' (0012, 0063) De-identification Method LO: 'Table;' (0018, 0015) Body Part Examined CS: 'Chest' (0018, 0050) Slice Thickness DS: "1.25" (0018, 0060) KVP DS: "120.0" (0018, 1110) Distance Source to Detector DS: "949.075012" (0018, 1111) Distance Source to Patient DS: "541.0" (0018, 1120) Gantry/Detector Tilt DS: "0.0" (0018, 1130) Table Height DS: "130.0" (0018, 1140) Rotation Direction CS: 'CW' (0018, 1151) X-Ray Tube Current IS: "79" (0018, 1170) Generator Power IS: "9600" (0018, 1190) Focal Spot(s) DS: "0.7" (0018, 1210) Convolution Kernel SH: 'BONE' (0018, 5100) Patient Position CS: 'FFS' (0020, 000d) Study Instance UID UI: 2.25.80896671862726099888461805953012988790 (0020, 000e) Series Instance UID UI: 2.25.51769600465874599901723496946193454321 (0020, 0010) Study ID SH: '' (0020, 0013) Instance Number IS: "1" (0020, 0032) Image Position (Patient) DS: [-158.700, -153.500, -69.750] (0020, 0037) Image Orientation (Patient) DS: [1.000000, 0.000000, 0.000000, 0.000000, 1.000000, 0.000000] (0020, 0052) Frame of Reference UID UI: 2.25.64058019325784235774105718339367403144 (0020, 1040) Position Reference Indicator LO: 'SN' (0020, 1041) Slice Location DS: "-69.75" (0028, 0002) Samples per Pixel US: 1 (0028, 0004) Photometric Interpretation CS: 'MONOCHROME2' (0028, 0010) Rows US: 512 (0028, 0011) Columns US: 512 (0028, 0030) Pixel Spacing DS: [0.652344, 0.652344] (0028, 0100) Bits Allocated US: 16 (0028, 0101) Bits Stored US: 16 (0028, 0102) High Bit US: 15 (0028, 0103) Pixel Representation US: 1 (0028, 0120) Pixel Padding Value SS: -2000 (0028, 1050) Window Center DS: "-500.0" (0028, 1051) Window Width DS: "-1500.0" (0028, 1052) Rescale Intercept DS: "-1024.0" (0028, 1053) Rescale Slope DS: "1.0" (0028, 1054) Rescale Type LO: 'HU' (7fe0, 0010) Pixel Data OW: Array of 524288 elements |
なんかめっちゃ出た。
中身を見てみると「Patient’s Name」(患者の名前)、「Manufacturer」(医療機器の製造会社)、「Rows」「Columns」(画像のサイズ) など様々なデータがDICOMデータの中に格納されています。
各データの取り出し
メタデータから欲しい情報を取り出していきます。
患者のIDを知りたいときは、PatientID
メーカー名を知りたい時は、Manufacturer
CTのスライスの厚さは、[0x0018,0x0050]
で取得できます。
|
1 2 3 4 5 6 |
#患者のID print(ds.PatientID) #医療機器製造会社 print(ds.Manufacturer) #スライス厚さ print(ds[0x0018,0x0050],"mm") |
|
1 2 3 4 |
#出力結果 ID00007637202177411956430 GE MEDICAL SYSTEMS (0018, 0050) Slice Thickness DS: "1.25" mm |
できました。
CT機械はGE製で、CTのスライス厚さは1.25mmみたいです。
画像を取得
最後に画像を取得します。
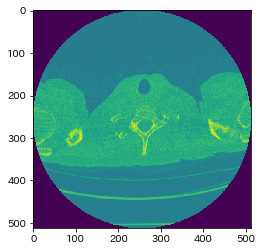
画像は、pixel_array で取得できます。
|
1 2 3 |
#画像の取得 ct_image = ds.pixel_array plt.imshow(ct_image) |

出ました。
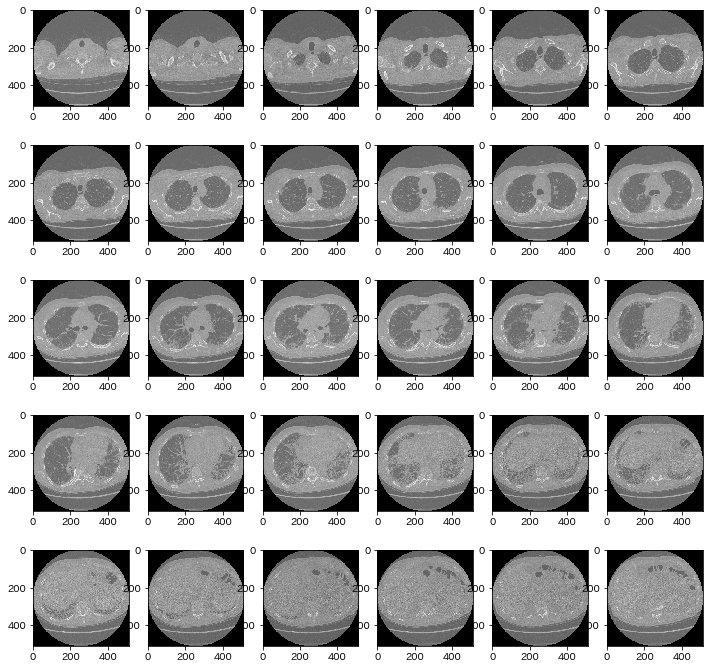
ちなみにコンペでは、30枚のdicom形式のデータが与えられているので並べてみます。
|
1 2 3 4 5 6 7 8 9 10 11 12 13 14 15 16 |
%matplotlib inline imdir = "./image/CT" print("total images for patient ID00123637202217151272140: ", len(os.listdir(imdir))) #CT画像を並べる fig=plt.figure(figsize=(12, 12)) columns = 6 rows = 5 imglist = os.listdir(imdir) for i in range(1, columns*rows +1): filename = imdir + "/" + str(i) + ".dcm" ds = pydicom.dcmread(filename) fig.add_subplot(rows, columns, i) plt.imshow(ds.pixel_array, cmap='gray')#グレースケールで出力 plt.show() |
|
1 |
total images for patient ID00123637202217151272140: 30 |

気分は外科医ですね。
まとめ
pydicomを使って医療画像を扱う方法を記載しました。
お医者さんの気分を味わえるのでお勧めです。


コメント